Deploying with Streamlit: Building Interactive Web Apps
Web App Wizardry: Turning AI Code into Interactive Playgrounds
Deploying with Streamlit: Building Interactive Web Apps
1. The Magic of Streamlit – Why It’s a Game-Changer
From Jupyter to Web: The Developer’s Dream
Imagine this: You've spent hours perfecting your and writing . Everything works perfectly in your local environment, but now you need to share your results with others. How do you make it interactive and visually appealing? You could export files, generate static reports, or spend weeks building a custom web interface. But none of these options are quick or straightforward, especially when you’re racing against time.
AI models
Python scripts
This is where Streamlit steps in, and it’s a total game-changer.
Streamlit is a Python library that allows you to turn your data scripts and AI models into interactive web apps in just a few lines of code. You don’t need to be an expert in front-end technologies like HTML, CSS, or JavaScript-Streamlit handles the hard work for you, making it incredibly easy to create something professional and functional.
With Streamlit, you can:
Build interactive dashboards or visualizations directly from Python.
Deploy machine learning models into a live, user friendly web interface.
Get results in real time, with no need to reload the page.
Why is Streamlit such a game-changer?
Fast Prototyping: Quickly convert your Python scripts into shareable web apps.
No Front-End Coding: No need to learn HTML, CSS, or JavaScript everything is done with Python.
Real-Time Interaction: Users can input data and see results immediately, without any page reloads.
Streamlit lets you focus on what you do best building powerful AI models while it takes care of transforming them into interactive applications. No more messy workarounds or complex setups.
Real-Life Scenario: The Weekend Hackathon Hero
Here’s a great example of how Streamlit can save the day.
Meet John, a data scientist working at a fast-growing startup. John had a brilliant machine learning model to predict housing prices, but he faced a dilemma: the hackathon he entered required him to present a polished, interactive demo—but he didn’t have time to build a front-end interface.
Instead of spending hours on web development, John decided to use Streamlit. In just a few hours, he turned his Python script into a fully interactive web app where users could input parameters like square footage, number of rooms, and location, and get an instant housing price prediction. No front-end work was required.
Why Streamlit saved the day:
John quickly created a fully functional app in no time.
The app was interactive, allowing users to adjust parameters and see results in real-time.
It helped John win the hackathon and catch the eye of potential investors.
In the end, John didn’t just showcase his machine learning model he created a professional-grade demo that wowed everyone. And all it took was Streamlit.
2. Streamlit in Action – How It Works
Getting Started with Streamlit
One of the best things about Streamlit is how easy it is to get started. You don’t need to worry about setting up complex servers or learning an entirely new language. With just a few steps, you can take your Python script and convert it into a fully functional web app.
To begin, all you need to do is install Streamlit with a simple command:
pip install streamlit
Once installed, creating your first app is as easy as running a Python script with the command:
streamlit run your_script.py
Key Features of Streamlit:
Simplicity: Install, write Python code, and run Streamlit handles the rest.
Instant Deployment: What you see in your script is what you get in the app, immediately.
Minimal Setup: No need to worry about complex configurations or infrastructure.
Building Your First Interactive App
Let’s break down how Streamlit turns your basic Python script into an interactive app.
Import Streamlit: Start by importing the streamlit module into your script.
Add Widgets: You can easily add interactivity like sliders, text boxes, and buttons using simple functions like st.slider(), st.text_input(), and st.button().
Display Results: With a few more lines, you can visualize results like charts and graphs using libraries like Matplotlib, Plotly, or Altair.
For example, here’s a simple code snippet to create a user interface for adjusting a parameter:
import streamlit as st

# Add a slider widget
slider_value = st.slider('Select a value', min_value=1, max_value=100)

# Display the slider value
st.write(f'Selected Value: {slider_value}')
Just like that, Streamlit gives you an interactive slider for users to adjust and see results on the fly, all within your Python script.
Powerful Features for Interactivity and Visualization
Streamlit isn’t just about making things interactive; it also offers some powerful features that make your app look great and function smoothly.
Here are some of the core features that make Streamlit shine:
Widgets:
st.button(): Adds buttons for user interaction.
st.selectbox(): Creates dropdown menus for easy selection.
st.text_input(): Lets users type text directly into the app.
Data Visualization:
st.line_chart(): Displays line charts instantly.
st.bar_chart(): Creates bar charts from data.
st.map(): Showcases data on maps for geospatial analysis.
Customizability:
st.markdown(): Allows you to add custom text or HTML to style your app.
st.image(): Lets you display images in your app—ideal for showcasing model results, diagrams, or product photos.
Real-Time Feedback: Streamlit apps update in real-time, so changes in input parameters or uploaded files instantly trigger updates in your app’s output.
Real-Life Scenario: Building an Interactive Data Dashboard
Let’s imagine you’re working with a large dataset and need to build a dashboard for stakeholders to visualize it. With Streamlit, you can create a dashboard that lets users:
Filter data based on certain criteria (like date range, location, etc.).
View charts that automatically update as the user adjusts the filters.
Download the processed data or charts as a report.
Here’s what you can do with just a few lines of Streamlit code:
Filter data: Use sliders and input fields for the user to adjust parameters.
Visualize results: Instantly plot updated graphs based on those inputs.
Download results: Provide downloadable reports with the st.download_button() function.
Streamlit’s Secret Sauce – The Layout and App StructureStreamlit offers a simple yet powerful way to organize your app layout. You can use columns to arrange elements side-by-side, or tabs to create a multi-page experience. These features let you design your app’s interface without requiring any advanced web design knowledge.
For example, with just a couple of lines, you can create a layout where charts appear next to data tables, or put various sections of your app into different tabs for easier navigation.
3. Deploying Your Streamlit App – Sharing Your Creation with the World
The Power of Deployment: From Local to Global
Building an interactive app is just the first step. Once you’ve created your Streamlit app, the next question is: how do you share it with the world? Fortunately, Streamlit makes deployment incredibly easy—no need for complex server configurations or dealing with cloud services like AWS or Azure. With a few simple steps, you can deploy your app and let others enjoy the magic you’ve created.
How Streamlit Simplifies Deployment:
No server setup required: You don't need to worry about setting up complex hosting environments.
One-click deployment: Services like Streamlit Sharing or Heroku make deployment as easy as clicking a button.
Quick access: Once deployed, your app is accessible via a unique URL, ready to be shared with colleagues, clients, or the public.
Using Streamlit Sharing – A Free and Fast Solution
One of the easiest ways to deploy your Streamlit app is through Streamlit Sharing, which provides a free, cloud-based platform for hosting your apps. It’s as simple as pushing your project to GitHub, connecting it to Streamlit Sharing, and clicking “Deploy.” In just a few moments, your app is live and ready to share with the world.
Steps to Deploy with Streamlit Sharing:
Push Your Code to GitHub: Make sure your app is in a public GitHub repository.
Connect to Streamlit Sharing: Log in to Streamlit Sharing with your GitHub account.
Deploy Your App: Select the repository, and Streamlit will automatically deploy your app.
Share Your App: You’ll get a unique URL to share with others. Done!
With Streamlit Sharing, you don’t need to worry about any infrastructure. Just focus on building great apps, and Streamlit takes care of the rest.
Alternative Deployment Options – Heroku and More
If you’re looking for more customization or want to use a different cloud platform, Heroku is another popular option for deploying Streamlit apps. Heroku allows you to deploy directly from a Git repository, with straightforward scaling options for larger apps.
To deploy your Streamlit app on Heroku:
Create a Heroku Account: Sign up at heroku.com.
Prepare Your App: Ensure you have a requirements.txt file listing all dependencies.
Deploy via Git: Push your app to Heroku using Git, and the platform will automatically install the dependencies and run your app.
Scale and Manage: You can scale the app, manage resources, and monitor performance directly from the Heroku dashboard.
Other deployment options include using Google Cloud, AWS, and Microsoft Azure, but these may require a bit more setup.
Real-Life Scenario: A Live AI Model Demo for a Client
Imagine you’ve built an AI-based recommendation system for an e-commerce client, and they want to see it in action. You’ve developed a Streamlit app that allows them to input product details and receive personalized product recommendations instantly. Now, it’s time to showcase the app.
Rather than sending them a static report or a video demo, you can deploy the app via Streamlit Sharing or Heroku. The client gets a live, interactive experience where they can test the system themselves.
Steps to showcase your app to the client:
Deploy your app on Streamlit Sharing or Heroku.
Send your client the unique URL.
Let them interact with the app, tweak parameters, and see results instantly.
This live demo makes your work feel polished and professional, and it allows the client to explore your AI model in real-time. Plus, it’s an incredibly effective way to demonstrate the power of your solution without needing any local setup.
Best Practices for Deployment
Even though Streamlit simplifies the deployment process, there are still some best practices to keep in mind when deploying your app to ensure it runs smoothly and securely.
Deployment Tips:
Test Your App: Make sure it’s fully functional before deploying it. Test all features, including widgets, charts, and interactivity.
Optimize Performance: Streamlit apps can get slow if they handle too much data at once. Use caching (st.cache) to store expensive computations and improve load times.
Secure Your App: If your app processes sensitive data, ensure that the deployment platform offers proper encryption and security measures.
4. Enhancing User Experience – Making Your Streamlit App Shine
Customizing Your App’s Design and Layout
While Streamlit provides powerful features for creating interactive web apps, sometimes you’ll want to add a touch of personalization to make your app feel unique. Fortunately, Streamlit offers several ways to customize the design of your app—without the need to dive into complex front-end code.
Layout Customization: Simple but Powerful
One of the most effective ways to organize content in your app is using layout elements. Streamlit provides several options to arrange components like charts, buttons, and text in an intuitive way.
Key layout options include:
st.columns(): Divide your app into multiple columns to display content side by side.
st.expander(): Add collapsible sections for additional details or advanced settings that users can open when needed.
st.sidebar(): A vertical panel on the left (or right) for easy navigation and controls like filters or parameters.
Example:
Here’s how you can use columns and expanders to create a neat, organized interface for your app:
import streamlit as st

# Two columns layout
col1, col2 = st.columns(2)

with col1:
    st.image('image.png', caption='AI Model', use_column_width=True)

with col2:
    st.write("This is where the magic happens!")

# Expandable section for advanced settings
with st.expander("Advanced Settings"):
    st.slider("Adjust sensitivity", 0, 100, 50)
By using layout tools like these, you can easily create a polished app with an intuitive user interface.
Adding Interactivity – Engaging Your Users
Streamlit isn’t just about presenting data—it's about creating a dynamic experience that engages users and lets them interact with your models and data. Here’s where widgets come in.
Popular Widgets in Streamlit:
st.slider(): Lets users adjust a numerical range, like price or quantity, in real-time.
st.button(): Adds buttons for triggering actions such as predictions or resetting parameters.
st.selectbox(): Offers a dropdown menu for users to select from different options (e.g., choosing between models).
st.file_uploader(): Allows users to upload files, such as CSVs or images, directly into the app for processing.
For example, let’s say you’ve built an AI app that predicts house prices. With st.slider(), users can adjust the number of bedrooms or square footage, and the price prediction will instantly update:
bedrooms = st.slider("Number of Bedrooms", 1, 10, 3)
sqft = st.slider("Square Footage", 500, 5000, 2000)

# Predict price based on inputs
predicted_price = model.predict(bedrooms, sqft)
st.write(f"Predicted House Price: ${predicted_price}")
This interactivity makes your app responsive and engaging, creating a seamless experience where users get immediate feedback on their actions.
Visualizations – Turning Data into Stories
A major strength of Streamlit lies in its ability to easily integrate data visualizations. Whether you’re showcasing trends, distributions, or comparisons, Streamlit makes it simple to display meaningful visual insights in your app.
Types of Visualizations:
Line charts: Show trends over time with st.line_chart().
Bar charts: Compare categories with st.bar_chart().
Maps: Display geographical data using st.map().
Custom Visuals: Streamlit also supports integration with libraries like Matplotlib, Plotly, and Altair to create even more advanced visualizations.
For example, if you’re building a dashboard to show sales data, you can use Streamlit to display real-time line charts:
import streamlit as st
import pandas as pd

# Sample data
data = pd.DataFrame({'Date': ['2021-01', '2021-02', '2021-03'],
                     'Sales': [2000, 3500, 4200]})

# Display the line chart
st.line_chart(data.set_index('Date'))
With these simple commands, you can turn raw data into clear and compelling visual stories that help users make informed decisions quickly.
Adding Personal Touches – Branding and Styling
While Streamlit’s default layout is clean and functional, you may want to give your app a personalized touch that aligns with your branding. Streamlit offers several options for styling and theming your app without requiring deep knowledge of CSS.
Streamlit’s styling options include:
st.markdown(): Add custom HTML or CSS for a personalized touch.
Themes: Define a theme (light or dark mode) in your config.toml file for consistent styling.
Custom Fonts: Use custom fonts or adjust text size to match your brand’s style.
For example, you can make your header bold and adjust its color using st.markdown() with HTML styling:
st.markdown("<h1 style='text-align: center; color: blue;'>Welcome to My App</h1>", unsafe_allow_html=True)
This way, you can make your app visually appealing while staying consistent with your branding.
Real-Life Scenario: Creating a Product Visualization Dashboard
Let’s imagine you’re building a product dashboard for a retail client. They want to visualize sales data, inventory levels, and customer satisfaction scores—all in one place.
With Streamlit, you can:
Use st.selectbox() to let the user choose between different time periods (e.g., last 30 days, 6 months, etc.).
Display line charts showing sales trends.
Use st.map() to show customer feedback based on geographic locations.
By adding these interactive elements, the dashboard becomes a powerful tool for data exploration and decision-making. Plus, users can adjust filters and instantly see updated visualizations without waiting for a page reload.
5. Scaling and Maintaining Your Streamlit App – Keeping It Running Smoothly
Preparing for More Users – Scaling Your App
As your Streamlit app gains popularity and attracts more users, you'll need to ensure that it scales efficiently. A well-built app should not only work well with a few users but also handle the demands of a larger audience without slowing down or crashing.
Key Considerations for Scaling:
Server Resources: If you’re hosting your app on a platform like Heroku or Streamlit Sharing, ensure your server can handle more traffic. These platforms offer scaling options, but you might need to upgrade your plan as usage increases.
Load Balancing: For more advanced scaling, using load balancers can distribute traffic across multiple instances of your app, ensuring no single server gets overwhelmed.
Performance Optimization: Streamlit apps can slow down if they handle too much data or perform complex computations in real-time. Here are a few tips:
Use Caching: Cache expensive computations with @st.cache to speed up your app and reduce redundant calculations.
Optimize Data Processing: Process data in chunks or use background tasks for resource-heavy operations to avoid overloading the system.
Handling Large Datasets Efficiently
As your app starts to work with more complex data whether it's from user uploads, databases, or external APIs—you’ll need to consider how to manage these datasets efficiently.
Best Practices for Managing Large Data:
Stream Data: Instead of loading entire datasets into memory, consider streaming data in smaller batches. This way, you can process large amounts of data without overwhelming your system.
Use Dask: For heavy data processing, Dask is a powerful tool that allows you to scale pandas operations to large datasets across multiple cores or machines.
Database Integration: If your app needs to query large datasets, consider integrating a database (like PostgreSQL or MongoDB) for faster querying instead of loading everything into memory.
Example: If you’re working with a large dataset of customer transactions, you might load only the data necessary for the current user’s request:
import pandas as pd

# Simulate loading only relevant data for the user
def load_data(user_id):
    data = pd.read_sql(f"SELECT * FROM transactions WHERE user_id = {user_id}", conn)
    return data
This helps your app stay responsive, even when handling significant data volumes.
Regular Updates and Bug Fixes – Keeping Your App Fresh
Once your app is live, it’s important to keep it updated and bug-free. A well-maintained app will retain users and continue to function properly over time.
Key Maintenance Tasks:
Monitor Logs: Regularly check for error logs to identify issues early. Platforms like Heroku and Streamlit Sharing offer monitoring tools that track errors and performance.
Update Dependencies: Keep your app’s libraries and dependencies up to date. This ensures compatibility with new features and security patches.
Collect Feedback: Continuously gather user feedback to improve functionality. For example, you could add a simple feedback form or monitor app analytics to see which features are most used.
Test New Features: Before rolling out updates, test new features in a staging environment to ensure they work as expected and don’t introduce new bugs.
Version Control and Continuous Deployment – Streamlining Updates
As you continue to develop and improve your app, version control becomes crucial. Using Git for version control allows you to track changes and collaborate with team members more efficiently.
Implementing Continuous Deployment (CD):
By setting up CI/CD pipelines, you can automate the process of testing and deploying new features. Services like GitHub Actions or GitLab CI allow you to automatically test your app every time new code is pushed, ensuring that bugs are caught early.
Here’s how you can integrate GitHub Actions for a simple continuous deployment workflow:
Create a .github/workflows folder in your repository.
Add a workflow YAML file to run tests and deploy the app whenever you push code.
Connect your repository to Heroku or your deployment service to automate the deployment process.
Real-Life Scenario: Scaling a Weather Forecast App for Global Users
Imagine you’ve built a weather forecast app that allows users to input their location and get accurate, real-time weather predictions. Initially, the app is just for a few users, but now it’s gaining global traction, and you want to ensure it scales to handle the increasing demand.
Here’s how to scale your app:
Use cloud hosting (like AWS EC2 or Google Cloud), which offers scalability and allows you to add more server instances as needed.
Optimize API calls by caching weather data locally for each location to avoid querying the external weather service on every request.
Set up a load balancer to ensure the app can handle requests from users around the world without downtime.
As your app gains more users, you'll also need to monitor its performance and make adjustments to keep it running smoothly.
Conclusion – Maintaining a Robust, Scalable App
As you scale your Streamlit app, it’s essential to think ahead and plan for the growth of your user base and data. By focusing on optimization, performance, and maintenance, you’ll ensure that your app continues to serve users well over time. Whether you’re handling complex data or adding new features, keeping your app responsive and up-to-date is the key to success.
6. Real-World Inspiration – What Others Are Building with Streamlit
Streamlit has enabled thousands of developers, data scientists, and hobbyists to transform their AI ideas into live, interactive apps no full-stack dev team needed. Whether you're in finance, healthcare, education, or just building side projects, there's a good chance someone has built something similar with Streamlit.
Real-World Streamlit App Examples
Let’s explore how others are turning code into compelling experiences:
AI-Powered Resume Scanner
Use Case: A job portal startup built a Streamlit app that scans resumes and scores them against job descriptions using NLP models like BERT.
How It Helps: Recruiters can instantly identify top candidates without manual screening.
Interactive Features:
Upload resume PDF
Input job description
View similarity score and keyword match heatmap
Medical Image Classifier
Use Case: A solo developer built a web app for classifying X-rays into categories like pneumonia, tuberculosis, or normal using a pre-trained CNN.
Why Streamlit? No need to build a front end just focus on the model.
Interactive Features:
Upload DICOM images
Show prediction probability
Highlight heatmap regions using Grad-CAM
Cryptocurrency Price Forecaster
Use Case: A data science enthusiast created an app that forecasts crypto prices using LSTM models.
User Engagement:
Select coin (e.g., BTC, ETH)
Choose time range
View line graphs with predicted prices
Why These Examples Matter
What these examples have in common:
Fast Prototyping: Built in hours or days, not weeks.
Accessible to Users: No installation just share a link.
Engaging UI: Widgets and visuals make them feel like real products.
These are not MVPs hidden in a GitHub repo they’re live demos that impress hiring managers, investors, and even casual users.
7. Conclusion – From Code to Creation, Fast
Turning your AI project into a usable, shareable app used to require full-stack expertise and weeks of dev time. Streamlit changes the game. Whether you’re a solo data scientist or a developer with a great idea, you can now go from model to product in a day without touching HTML, CSS, or JavaScript.
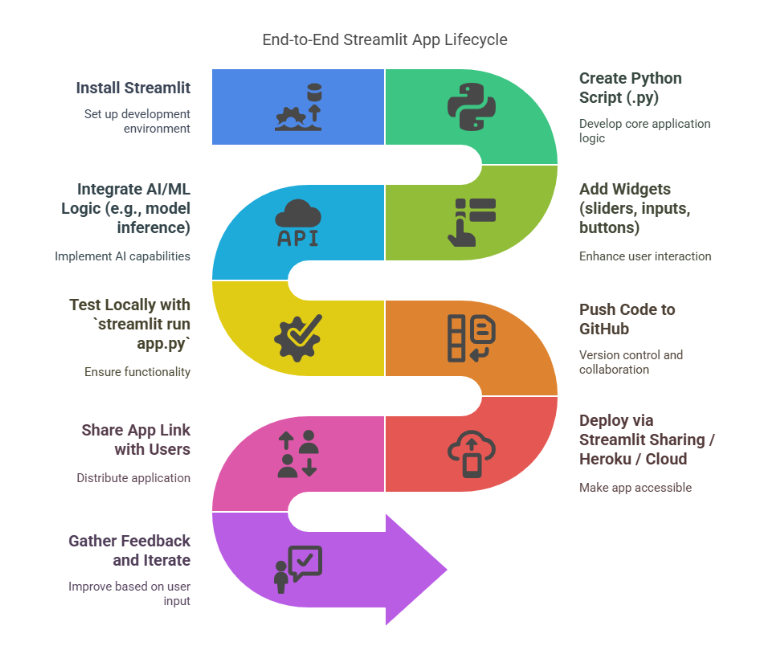
Throughout this guide, we’ve walked through:
Why Streamlit is a top pick for building AI-powered apps
How to set up and structure your project
Adding real-time interactivity and user input
Deploying your app to the world
Keeping it scalable and efficient
Real-world apps to inspire your next project
The next big AI tool could be just one Streamlit app away and you could be the one to build it.